Troubleshooting the Most Common Problems
By Shruti Chaturvedi (opens in a new tab)
Learn about the possible reasons your Uffizzi ephemeral environments might be failing and how you can fix them.
1. Container killed due to insufficient memory (OOM Kill)
The most common reason Uffizzi ephemeral environments might not be working is an out-of-memory (OOM) error. This error occurs when a container does not have enough resources assigned to it.
If no memory limit is set in the docker-compose.uffizzi.yml, by default, Uffizzi sets a 500 megabytes (500M) memory limit on each container, which may not be sufficient for certain memory-intensive applications. If insufficient memory is allocated to a container, the container will either exit with the OOM error or sometimes with an application-specific exit code indicating that the containerized application needs more memory.
If you see your container exiting due to OOM Kill you can increase its memory by using the deploy.resources.limits key in your docker-compose.uffizzi.yml file.
memory defaults to 500M, but you can increase the memory using the following increments: 1000M, 2000M, and 4000M.
services:
  myservice:
    image: example.azurecr.io/example-service:latest
    deploy:
      resources:
        limits:
          memory: 500M
Uffizzi supports the following memory limits for a container 125M, 250M, 500M, 1000M, 2000M, and 4000M. Depending upon the memory usage of your application, you can set either of these limits on your containers. In case your application needs more memory, you can contact us here.
2. Container dependency chain is not working
Uffizzi does not currently support depends_on (opens in a new tab) within the docker-compose.uffizzi.yml to define container dependencies. In case your container needs to wait for other containers to start, you can use tools like dockerize (opens in a new tab), wait4ports (opens in a new tab), or wait-for-it (opens in a new tab). dockerize (opens in a new tab) supports waiting for services on a number of protocols: file, TCP, HTTP, HTTPS, and Unix. wait-for-it (opens in a new tab) and wait4ports (opens in a new tab) only support TCP sockets. To use dockerize (opens in a new tab) and wait4ports (opens in a new tab), you can go through the installation steps to add these as dependencies in your application. wait4ports (opens in a new tab) on the other hand is a shell script, and you’ll only need the wait-for-it.sh (opens in a new tab) script to use this tool.
Depending upon the tool you’re using, once it is configured, it can be used with the entrypoint (opens in a new tab) or command (opens in a new tab) directives in the docker-compose.uffizzi.yml. Alternatively, you can also wrap the call to your application using the ENTRYPOINT or CMD directives in the application’s Dockerfile.
For example, your backend application might need to wait for Postgres to be running before it starts. Here is how you can define that dependence in your docker-compose.uffizzi.yml using dockerize:
entrypoint: ["dockerize", "-wait", "tcp://localhost:5432", "-timeout", "3600s"] The timeout flag is optional. In case Postgres cannot be reached within the limits of the timeout, your application will exit with code 1.
This can also be defined using the command (opens in a new tab) directive:
command: ["dockerize", "-wait", "tcp://localhost:5432", "-timeout", "3600s"] Using wait4ports:
entrypoint: ["wait4ports", "tcp://localhost:5432"] Using wait-for-it (make sure you have added the wait-for-it.sh (opens in a new tab) script to your application’s runtime):
entrypoint: ["./wait-for-it.sh tcp://localhost:5432"]3. Init container finishes and a previously working environment throws Service Unavailable error
Often if an application has init containers, the ephemeral environments will start throwing a Service Unavailable error as soon as the init container completes successfully and exits. This happens because all the containers in a given environment have the same life cycle. Therefore, when an init container completes its execution and exits, the other containers also exit and your ephemeral environment might throw a 503 error.
To prevent your containers from exiting when the init containers complete execution, you’ll need to keep the init container running by providing it with an infinite process. There are a few of ways to do this:
- Add an infinite loop at the end of the init-container script
- Use
tail -f /dev/null, or usesleep infinity - Adding any process that will keep the init container running will fix this issue
4. Volumes: file or directory is too large
When mounting host/non-empty volumes (opens in a new tab), you might get an error saying that the file or the directory you’re mounting is too large. Currently, Uffizzi support non-empty volumes for files and directories up to 1MB (compressed) (opens in a new tab), although you can mount multiple volumes each up to 1M.
If the size of the file or the compressed folder you’re mounting exceeds 1MB, you’ll get the error - file or directory is too large during the creation of your ephemeral environment.
As a workaround, you can mount multiple non-empty volumes in your docker-compose.uffizzi.yml:
services:
 app:
   image: myproject/app
   volumes:
     - ./frontend/public/svg:/frontend/public/svg
     - ./frontend/public/assets:/frontend/public/assets
     - ./frontend/src/app:./frontend/src/app
5. Passing files as source path to non-empty volumes
You cannot directly pass the path to files as non-empty volumes (opens in a new tab). The following way of mounting files will fail the deployment:
services:
 app:
   image: nginx
   volumes:
     - ./nginx/nginx.conf:/etc/nginx/nginx.conf
If you want to mount a file(s) onto your container, you can place it in a directory and mount the directory. You can try the previous case in this way:
services:
 app:
   image: nginx
   volumes:
     - ./nginx:/etc/nginx
If you are using Uffizzi CI, you can utilize the configs (opens in a new tab) directive in the docker-compose.uffizzi.yml file. The above, in Uffizzi CI, can be achieved in the following way:
services:
  nginx:
    image: nginx
    configs:
      - source: nginx-conf
        target: /etc/nginx/nginx.conf
configs:
  nginx-conf:
    file: ./nginx/nginx.conf
6. Setting and accessing sensitive environment variable (Compose Environments)
If you're using Uffizzi Compose Environments, you can set sensitive environment variables like access tokens, secret keys, etc. by storing it within your CI platform and accessing it through the environment (opens in a new tab) directive in the docker-compose.uffizzi.yml file with variable substitution.
Example with GitHub Actions
Once you have added the secrets to your GitHub repository, these can be accessed in your GitHub Actions (GHA) workflow file. You can then export them and consequently, they will be available for use within your compose file.
After you have added your secret to your GitHub repository (opens in a new tab), add the following line to the Render Compose File step in the render-compose-file job:
SOME_SECRET=${{secrets.SOME_SECRET}}render-compose-file after adding the above line:
  render-compose-file:
    name: Render Docker Compose File
    # Pass output of this workflow to another triggered by `workflow_run` event.
    runs-on: ubuntu-latest
    needs:
      - some-job
    outputs:
      compose-file-cache-key: ${{ steps.hash.outputs.hash }}
    steps:
      - name: Checkout git repo
        uses: actions/checkout@v3
      - name: Render Compose File
        run: |
          APP_IMAGE=${{ needs.some-job.outputs.tags }}
          export APP_IMAGE
          SOME_SECRET=${{secrets.SOME_SECRET}}
          export SOME_SECRET
          # Render simple template from environment variables.
          envsubst < docker-compose.uffizzi.yml > docker-compose.rendered.yml
          cat docker-compose.rendered.yml
Once you export the secret from the GHA workflow file, you can leverage the environment (opens in a new tab) directive in the docker-compose.uffizzi.yml file and through environment substitution, use this secret like below:
  my_app_fe:
    image: app_fe_image
    environment:
      SOME_SECRET: "${SOME_SECRET}"
  my_app_be:
    image: app_be_image
    environment:
      SOME_SECRET: "${SOME_SECRET}"
7. HTTP 503 Errors in Ephemeral Environments (Node.js)
Some users may experience 503 errors when running the tests against their Node.js applications deployed to Uffizzi ephemeral environments. These errors are usually encountered during the first run after the Uffizzi stack is spun up.
Symptoms
- 503 errors occurring, particularly during the first run after the Uffizzi stack is spun up.
- Most of the tests failing due to the appearance of 503 errors.
- Containers restarting
- Application error:
"FATAL ERROR: Ineffective mark-compacts near heap limit Allocation failed - JavaScript heap out of memory error Command failed with signal "SIGABRT"Probable Cause
The 503 errors and heap-related failures are likely caused by the Node.js applications running within the web-app containers running out of memory. This is especially common when using Node.js for applications with high memory usage.
Troubleshooting Steps
-
Profile the Workload: Start by profiling the workload and identifying the parts of the application that consume the most memory. Look for areas that might be improved to be more memory-efficient. This can be done using various Node.js profiling tools.
-
Increase Node.js Heap Size: Try increasing the heap size for Node.js by setting the environment variable
NODE_OPTIONSto a value like--max-old-space-size=400. This can be done in the container's configuration or within the Node.js application itself.export NODE_OPTIONS=--max-old-space-size=400 -
Increase Container Memory Limit: If increasing the Node.js heap size doesn't resolve the issue, you can try increasing the memory limit for the web-app container. This can be achieved by setting the memory limit to a higher value, such as
1000Mior2000Mi. After doing this, set theNODE_OPTIONSenvironment variable to a value like--max-old-space-size=900or--max-old-space-size=1900.web-app: ... deploy: resources: limits: memory: 2000Mexport NODE_OPTIONS=--max-old-space-size=900 -
Monitoring and Scaling: Keep a close eye on the container's resource usage. Monitoring tools can help you understand memory consumption and performance bottlenecks. If necessary, consider manual scaling of the application to allocate more resources.
-
Optimize Application Code: Continue optimizing the application code to reduce memory usage. Techniques like memory caching, stream processing, and avoiding unnecessary object duplication can help in this regard.
8. Unauthorized: Bad Credentials (GitHub Integration)
There are a few reason you might see the following error message in your account Settings > General page:
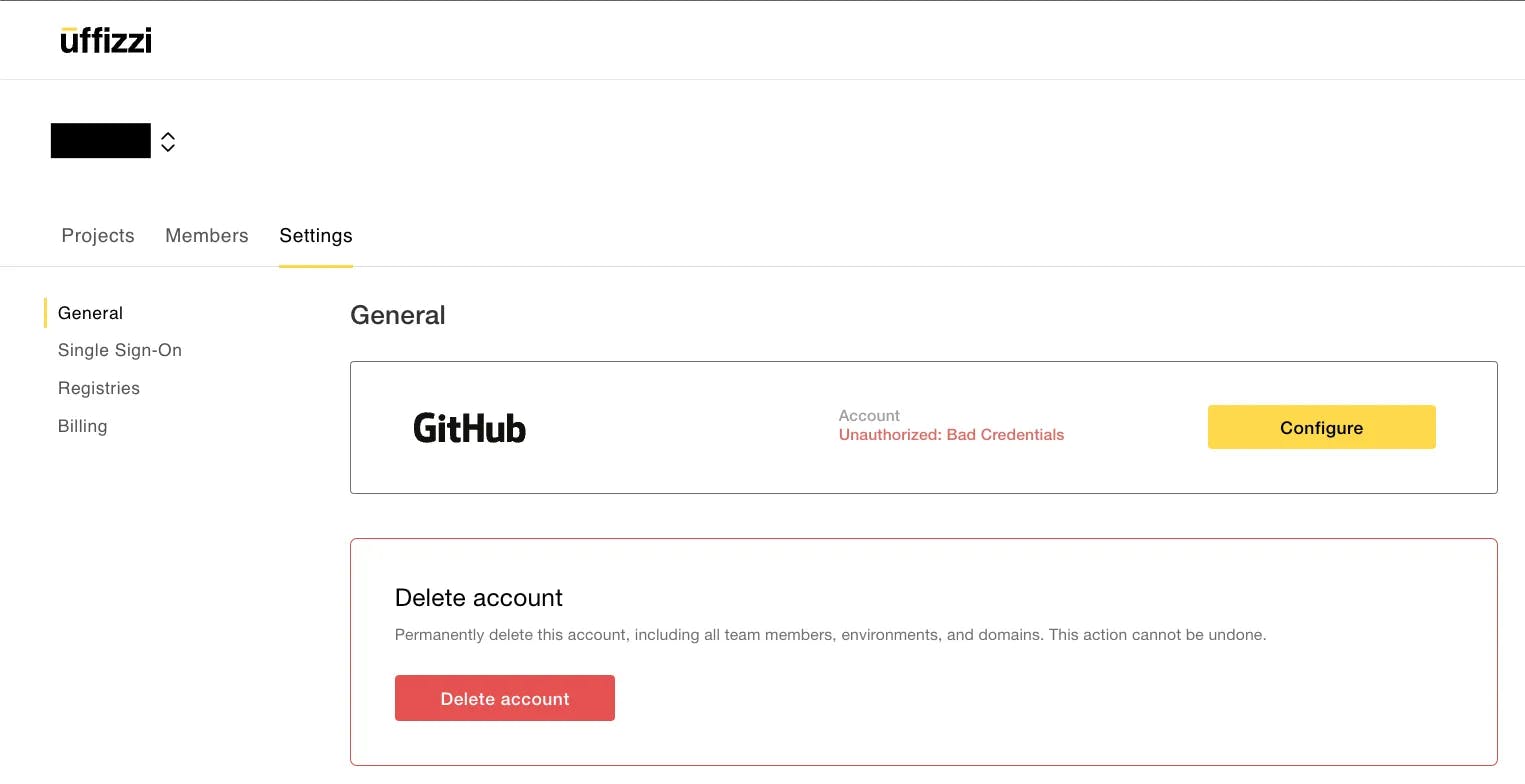
For example, your credentials may have changed, you tried configuring your Uffizzi Team with a personal GitHub account (or vice versa), or perhaps something else. The easiest solution is to simply uninstall and then reinstall the Uffizzi Cloud GitHub App. This will re-establish the connection between your GitHub account and Uffizzi.
To uninstall the Uffizzi Cloud GitHub App, go to GitHub.com > Account > Settings > Applications > Installed GitHub Apps > Uffizzi Cloud > Configure > Uninstall “Uffizzi Cloud”.
9. Error: File or Directory is Too Large (Compose Environments)
If you need to mount host files and directories to their Uffizzi ephemeral environments, you can achieve this through the volumes directive within services in the docker-compose.uffizzi file (example below):
services:
 proxy:
   image: nginx
   volumes:
     - ./nginx_conf:/etc/nginx

volumes:
 share_db:
Uffizzi compresses the source file or directory to archive. If you’re using Uffizzi with a CI platform, the size of this archive needs to be less than 1 MB, the currently supported limit (support for larger volumes is planned). If you mount a file or directory, which is larger than 1 MB compressed, you’ll see an error, File or Directory is Too Large.
As a workaround, you can mount multiple volumes each up to 1 MB, Mouting multiple volumes, however, be onerous for cases where multiple files and/or directories need to be mounted, each coming to be larger than 1 MB compressed.
The question is: how to mount larger files and/or directories on Uffizzi ephemeral environments built using an external CI in cases where mounting multiple volumes is cumbersome. Below are the steps of how you can achieve this effortlessly.
Solution
In this example, we are looking at how you can make larger files (compressed size over 1MB) available to your Uffizzi ephemeral environment built using GitHub Actions (GHA). The same procedure can be followed for other external CIs.
The solution assumes that the file or directory you’re mounting is available in your git repo. Once the file is available in the git repo, you then download the zipped source (or clone the repo) into your container using the command directive. Depending upon your use case, you might have to export certain variables from your external CI and use these within docker-compose.uffizzi.yml. Step-by-step below:
Step 1: Export GHA Context Variables
This is an important step in the case where the file or directory to be mounted changes the behavior of the environment. The variables we export will make sure that the most recent changes in your repo are downloaded in the container.
In your GHA workflow file, under the Render Compose File step in the render-compose-file job export the following variables:
github.actor → represents the committer
github.event.repository.name → represents the name of the repository (head repository, in case the environment was spun for a PR from a fork)
github.head_ref → represents the branch within the repo for which the environment will be spun
These GitHub context (opens in a new tab) variables will make sure that the repository that is downloaded to the container—which includes the file or the directory that needs to be mounted—contains the most recent changes.
The render-compose-file step in your GHA workflow file should look like this:
render-compose-file:
name: Render Docker Compose File
# Pass output of this workflow to another triggered by `workflow_run` event.
runs-on: ubuntu-latest
needs:
    - build-application
outputs:
    compose-file-cache-key: ${{ steps.hash.outputs.hash }}
steps:
    - name: Checkout git repo
    uses: actions/checkout@v3
    - name: Render Compose File
    run: |
        APP_IMAGE=${{ needs.build-application.outputs.tags }}
        export APP_IMAGE
        GHA_ACTOR=${{github.actor}}
        GHA_REPO=${{github.event.repository.name}}
        GHA_BRANCH=${{github.head_ref}}
        export GHA_ACTOR GHA_REPO GHA_BRANCH
        # Render simple template from environment variables.
        envsubst < ./uffizzi/docker-compose.uffizzi.yml > docker-compose.rendered.yml
        cat docker-compose.rendered.yml
You’ll need these variables only if you want the most recent changes reflected in your environment. If, however, your environment is not dependent on changes you make, these variables are not needed.
Step 2: Download the git repo in your container
You can now download the git repo in your container. Once you have access to the file/directory, you can then also move it to a custom location as if you were mounting a volume to a certain destination.
In the following example, we will download the zipped source that contains the directories our container needs with the most recent changes using wget (make sure the utility is available in your container). In your docker-compose.uffizzi.yml, make the following changes in your container:
  app:
    image: my_image
    ports:
    - "3000:3000"
    entrypoint: ["/bin/bash"]
    command:
    - "-c"
    - "apt-get update && \
      apt-get install wget -y && \ # install wget
      wget 'https://github.com/$GHA_ACTOR/$GHA_REPO/archive/refs/heads/$GHA_BRANCH.zip' && \ # download the most recent changes from the git repo
      unzip $GHA_BRANCH.zip -d . && \ # unzip at root
      rm -rf $GHA_BRANCH.zip # delete the zipped folder
      "
As your container comes up, these commands will be executed, and your git repo will be downloaded at the location you define in your container, and unzipping it will make your entire project available in the container. Alternatively, if your ephemeral environment is not dependent upon changes made to the file/directory you’re trying to mount, you can also simply clone the remote repository into the container at the location you want.
This way the files and the directories you need will be made available to your application, and you will have easily passed the File or Directory Too Large error. In case this approach does not solve your problem, reach out to us (opens in a new tab) and let us know how we can help.
Other issues?
If you're having issues with your Uffizzi ephemeral environment that are not listed above, get help on Slack (opens in a new tab) or set up a Zoom call (opens in a new tab) with a member of our Technical Support Team.