Install Uffizzi Business (~ 5 minutes)
Install Uffizzi Business to create ephemeral environments on your own infrastructure.
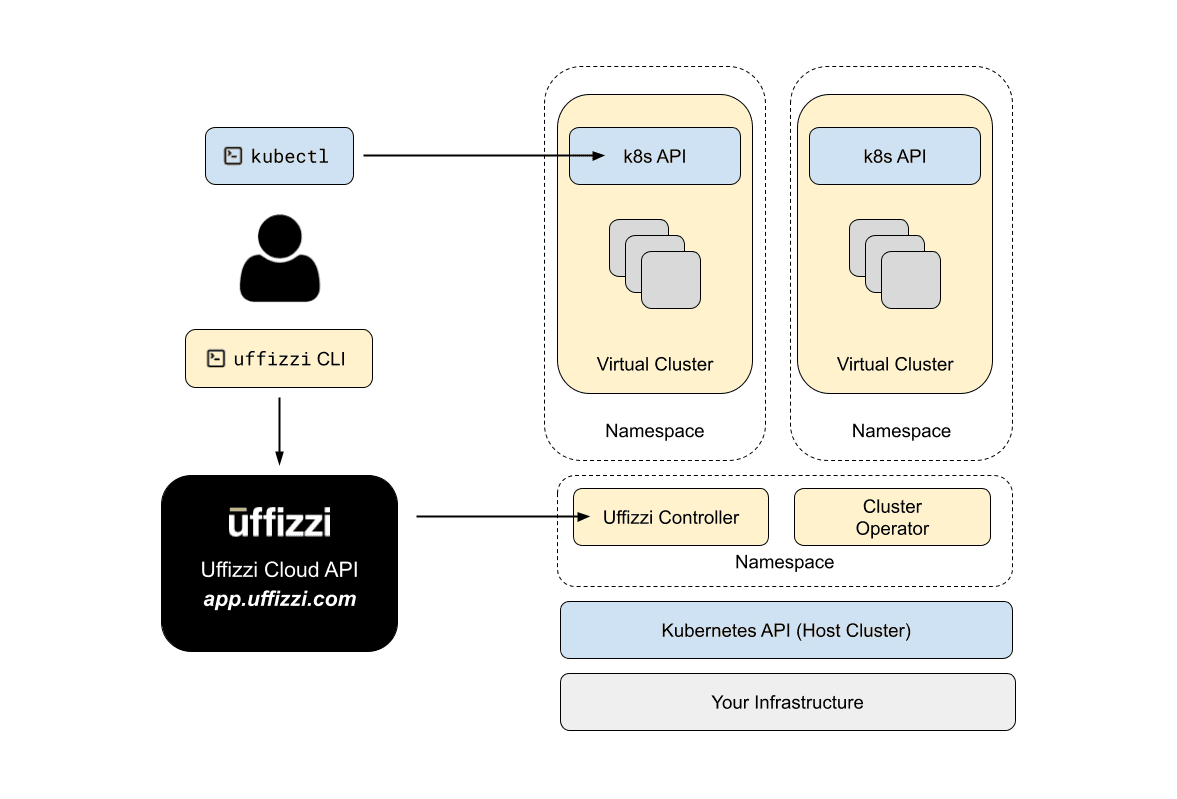
With Uffizzi Business you install the Uffizzi data plane on your own Kubernetes cluster, while the Uffizzi Cloud API (app.uffizzi.com) acts as the control plane. Requests from the CLI are routed through Uffizzi Cloud, while workloads run on your cluster.
Once installed, you'll be able to create and manage ephemeral environments from the Dashboard web UI or the Uffizzi CLI.
Pre-requisites
Google Kubernetes Engine (GKE) Autopilot clusters (opens in a new tab) are not currently supported for Uffizzi Business. Please use a standard GKE cluster, or contact our team for installation assistance at support@uffizzi.com.
Items in the following list are required to install Uffizzi:
- Install the Uffizzi CLI
- Create a Uffizzi account (opens in a new tab) (to activate your license and start your 14-day free trial)
- Kubernetes cluster (version 1.19 or greater) with public Internet access
- A node with enough CPU and memory for the Uffizzi installation (2 CPU cores and 2GB of memory recommended) and your workloads
- A domain to use for the Uffizzi Controller hostname (e.g.
uffizzi.example.com) and permission to update your DNS records - A business email address (required for
letsencryptcertificate generation)
Uffizzi Business requires that your cluster have public network access, therefore it will not easily install on a local instance of Kubernetes, such as minikube. To host both the Uffizzi data plane and control plane without the need for over-network communication, email sales@uffizzi.com about Uffizzi Enterprise.
What will be installed?
- Uffizzi Controller
- Uffizzi Cluster Operator
- Dependencies:
cert-manager(opens in a new tab),ingress-nginx(opens in a new tab),flux(opens in a new tab)
Architecture
Uffizzi CLI requests are sent to the Uffizzi Cloud API (app.uffizzi.com), which then forwards the request to your instance of the Uffizzi Controller. The Uffizzi Controller then communicates with your instance of the Uffizzi Cluster Operator to perform the requested action on the host Kubernetes cluster.
Get Started
Update your CLI
Be sure you've got the latest version of the Uffizzi CLI:
Login or create an account
Running this command will open a browser window where you can create an account or login to an existing account. This step is required to activate your license.
uffizzi login
# Login successful
# Select an account: (Press ↑/↓/←/→ arrow to move and Enter to select)
# ‣ jdoe
#   Acme Inc
Install Uffizzi Business platform
uffizzi install HOSTNAME --email EMAIL --namespace NAMESPACE --context CONTEXTReplace HOSTNAME with the hostname to use for the Uffizzi Controller (e.g. uffizzi.example.com).
This command accepts the following options:
| Options | Description | Default |
|---|---|---|
--email (required) | A business email address (required for generating letsencrypt certificates) | - |
--namespace | The Kubernetes namespace where you want to install Uffizzi | default |
--context | The Kubernetes context to use when installing Uffizzi | Current context |
The installation process will take a few minutes to complete.
Update DNS
After installation, you will need to update your DNS records.
The uffizzi install command will append controller as a subdomain to the HOSTNAME you provided in Step 3, e.g. *.uffizzi.example.com.
To configure DNS, create a record for this Controller hostname, pointing to the IP address or hostname output by the uffizzi install command (i.e. the IP or hostname of the Controller service on your host cluster). The IP or hostname will be returned by the uffizzi install.
- If the output of the
uffizzi installcommand is an IP address, create anArecord:
| Type     | Name                  | Data          | TTL    |
|----------|-----------------------|---------------|--------|
| A        | *.uffizzi.example.com | 34.132.250.26 | 1 hour |
Be sure to use your actual IP address for the Data field, not the one in the example above.
- If the output is a hostname, create a
CNAMErecord:
| Type     | Name                  | Data                                                             | TTL    |
|----------|-----------------------|------------------------------------------------------------------|--------|
| CNAME    | *.uffizzi.example.com | 9fe86db0368dc670f25a426024e9cbdc.sk1.us-east-1.eks.amazonaws.com | 1 hour |
Be sure to use your actual hostname for the Data field, not the one in the example above.
Verify installation
Once your DNS records have been updated, you can verify that the Controller and Cluster Operator are working by running the following command:
uffizzi cluster createThis should create a virtual cluster on your host cluster that you can access with kubectl or a similar tool.
If you have any issues, reach out on Slack (opens in a new tab) or email support@uffizzi.com.
After installation, your cluster will be registered with Uffizzi and you will be able to create ephemeral environments from the CLI on your own Kubernetes cluster.
Uninstall Uffizzi
To uninstall Uffizzi, run the following command:
uffizzi uninstall --namespace NAMESPACEThis command will remove the Uffizzi Controller and Uffizzi Cluster Operator from the NAMESPACE of your cluster, as well as any other resources created by Uffizzi. Your account will be configured to use the default Uffizzi Cloud Controller and Operator.
Next Steps
Checkout the Qucikstart guides, or see the CLI section for more information.